Migrate, and baking content
A small problem in Drupal occurs when developing new modules, or installation profiles. Content. It goes missing, and without it developing can go wrong very quickly. Also, starting up a site’s install profile that reveals a site without content gives a feel of walking into an empty bakery shop. There’s ovens, flour, and bakers, and that great bakery smell all around, but no bread. And possible clients go to other bakeries if you run out of bread. So to solve this issue, Migrate module helps us fill up the shop with bread. Oh, and you can also migrate data from other (older) sites.
What is it good for?
Migrate fills up your Drupal installation profile, or just fresh new module, with appropriate content that helps the user or developer experiment with it, so the new module’s learning curve is easier. When developing, if you mess something up - say, drop the user table - it won’t be as bad as it could’ve been, since you kept around a backup in a CSV file. Some company want their site upgraded? No problem. Migrate can import from CSV, SQL databases, XML and much more.
_For the less technical: if you think I’m just naming random letters, relax: if you have Microsoft Excel, or even OpenOffice (it’s free!), you can start creating content before you even have a site. Just open up a new table in either software, and save it as a CSV file. Your developer should be able to guide you through in a few minutes. If he can’t, well, you might want to consider a different one.
Migrate provides a strong advantage when developing installation profiles. When you rebuild a profile, the existing database is thrown away and replaced with a new one. But most of the time, you will need content to work with, test your logic, and see the resulting displayed page. With Migrate, when you install a profile, you can automatically import content to work with.
Also, Migrate is great for its obvious main purpose - to migrate sites’ content to a drupal installation. This is great if you’re building a site for a client that already has a working site but is looking for an upgrade and is afraid of losing all of the site’s content.
However, the best use of Migrate is during the initial development of a new site. Think of it like that: the bakery is still being built, but the baker can’t wait to start baking. He has all those little recipes he’s anxious to try, so in the meantime he prepares dough and keeps it in his household refrigerator. The same principle occurs with Migrate: while Dave, the developer, is building on the structure of the database, content types and whatnots, Sam, the site’s manager, can start creating content, and customize its structure according to his needs. All Sam needs to do is create a table and save it in some Migrate-able format (like a CSV file) . This saves time for Sam till he can launch the site, since he can start preparing the content – and put the dough straight in the oven from the refrigerator, without hassling around with flour and eggs. The site will have a quicker ‘cool down’ time between the development is finished until the site is actually launched, since the content is already stored and ready to be used.
Not only time is saved. Dave receives less stress from Sam while developing, since Sam is busy creating content for the new site. Confusion is reduced when Sam decides some content’s structure needs to be altered during development (which occurs quite often) to better suit his needs. A more finely defined content is created as a result, better suited to Sam’s needs, and with less last-minute fixes. A few lines of migration code and voila! Everything is ready for the newly structured content.
So, how do I use Migrate?
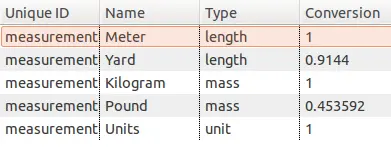
Data storage (a.k.a - Sam’s side of the story) The migrate module reads information stored in .csv files. An example of one of these is shown below:

Notice that ‘company’ and ‘status’ columns are filled with references to other entities’ IDs.
That’s it for site developers. Create a table, make sure everything sits the way you want it, and send it to the developer.
The Drupal side: (a.k.a - Dave’s side of the story)
If you’re reading this, I’m assuming you are a Drupal developer (it’s quite technical from now on). I’ve written a simplified example, divided into parts. In this example, I’ve shown how to migrate content from CSV files. A complete, working example of an abstract migration class can be found here - and in the same git repository there is a complete implementation of a custom Migrate module. All the CSV files under a CSV directory using a naming convention csv/entity_type/bundle.csv. Example of using this abstract class to import taxonomy terms is shown below:
<?php
/**
 * Migrate measurement unit terms.
 *
 * Use garmentboxMigration class to import taxonomy terms.
 */
class garmentboxMeasurementUnitTerms extends garmentboxMigration {

  // Define entity type and bundle, used in garmentboxMigration.
  public $entityType = 'taxonomy_term';
  public $bundle = 'measurement_units';

  // Map columns to import. garmentboxMigration already mapped "id" and
  // "name".
  public $csvColumns = array(
    'field_unit_type',
    'field_conversion_ratio',
  );

  public function __construct() {
    parent::__construct();
    // Map the mapped columns to fields.
    $this->addFieldMapping('field_unit_type', 'field_unit_type');
    $this->addFieldMapping('field_conversion_ratio', 'field_conversion_ratio');
  }
}
?>
And that’s it. garmentboxMigration takes care of stitching everything together, and putting the data in the content’s fields. You can obviously extend this abstract class to fit your own business logic.
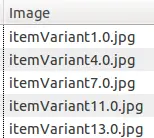
Importing files and images is also easy:
<?php
$this->addFieldMapping('field_image', 'field_image');
$this
  ->addFieldMapping('field_image:file_replace')
  ->defaultValue(FILE_EXISTS_REPLACE);
$this
  ->addFieldMapping('field_image:source_dir')
  ->defaultValue(drupal_get_path('module', 'example_migrate') . '/images');
?>
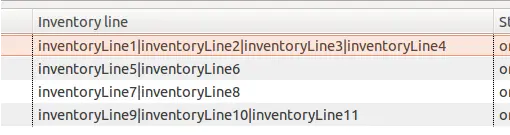
For multiple values in one field, use the separator(’|’) function when defining field mapping:
<?php
$this
  ->addFieldMapping('field_inventory_line_inline', 'field_inventory_line_inline')
  ->sourceMigration('exampleInventoryLines')
  ->separator('|');
?>
For additional data tweaking, we can use the prepare(), prepareRow(), and complete() functions.
<?php
public function complete($entity, $row) {
  // Do something, e.g. flag a flag on the node.
}
?>
After everything is built, we stroll over to the UI (admin/content/migrate) and select what we want to import, and import away. Alternatively, Migrate can run through drush, which you’ll probably want to use when using an installation profile.

Amitai Burstein
@amitaibu