How We Theme in Gizra with PEVB and a Composable Approach
A different approach using composition to solving the Drupal theming problem
Theming is hard. It’s usually the most time-consuming part in our work. Writing a DB query or baking logic into a Drupal hook is the easy part. The main challenge is making an element look like the design and appear correctly on different devices and browsers.
Our main goals remain the same as from this post:
- Standardization in multiple projects
- Reduction in cognitive load
- Optimization for rewrites
All the code examples in this post are inside our Drupal-starter. You can install it locally, and see all the elements under the Style guide page - https://drupal-starter.ddev.site:4443/style-guide. The Drupal-starter code base is used as the starting point of our projects, so you’ll find it very mature!

A quick reminder is that for theming, we’re using the Pluggable entity view builder module, known as PEVB.
Back to our problem - we don’t want to theme the same things over and over again. This sounds trivial, but I’m sure many are doing that. We have! Here’s an example of two different twig files:
<div class="flex flex-col gap-y-3 md:gap-y-5">
  {{ title }}
  {{ body }}
</div>
<div class="flex flex-col gap-y-3 md:gap-y-5">
  {{ author }}
  {{ teaser }}
  {{ date }}
</div>
The cards’ contents differ but the wrapper classes are the same. Also, the chances of changing the gap on one twig file and forgetting the other are high. At least for us, on bigger projects, updating the gap on only some files was a common thing.
Let’s think of the designer for a moment. Should the gap between items be 20px or 24px? The answer, for us, is “whatever works best as long as it’s consistent™.” If one card is 20px, then all cards should be the same. To deal with that, we have a limited set of trait methods:
wrapContainerVerticalSpacing(20px)wrapContainerVerticalSpacingTiny(2px)wrapContainerVerticalSpacingBig(40px)wrapContainerVerticalSpacingHuge(60px)
The server-theme-container-vertical-spacing.html.twig is a very simple one. It’s only placing the items with a specific gap.
What if we wanted to change the font size? We should take care of the responsive design, but we don’t want to keep writing that repeatedly in different twig files. For that, we have wrapTextResponsiveFontSize, and again, a very concise twig file server-theme-text-decoration--responsive-font-size.html.twig
Do you need more font sizes? Or more vertical gaps? You could add and adapt - but we find there’s also a lot of value in limiting the design.
So with the above. If we wanted to output some titles and body, with different font sizes and with some vertical gap, it would look something like this:
<?php

// $title = …
// $body = …

$elements = [];

// Title.
$element = $this->wrapTextResponsiveFontSize($title, '3xl');
$element = $this->wrapTextFontWeight($element, 'bold');
$element = $this->wrapTextItalic($element);
$elements[] = $element;

// Body.
$element = $this->wrapTextResponsiveFontSize($body);
$element = $this->wrapTextColor($element, 'light-gray');
$elements[] = $element;

// Add a vertical gap and a horizontal container.
$elements = $this->wrapContainerVerticalSpacing($elements);
return $this->wrapContainerWide($elements);
Looking at the above example, you’ll see we’ve used methods I haven’t explained. But by reading the code, you will get a good sense of how it would look. This kind of code should be placed inside the ElementTrait. Let’s look at real examples, such as what the CTA element looks like:

<?php

/**
 * Build a CTA.
 *
 * @param string $title
 *   The title.
 * @param array $body
 *   The body render array.
 * @param string $button_text
 *   The button text.
 * @param \Drupal\Core\Url $url
 *   The URL to link the button to.
 *
 * @return array
 *   Render array.
 */
protected function buildElementCta(string $title, array $body, string $button_text, Url $url): array {
  $elements = [];

  // Title.
  $element = $this->wrapTextResponsiveFontSize($title, '3xl');
  $element = $this->wrapTextCenter($element);
  $elements[] = $this->wrapTextFontWeight($element, 'bold');

  // Text.
  $elements[] = $this->wrapProseText($body);

  // Button.
  $elements[] = $this->buildButton($button_text, $url, TRUE);

  $elements = $this->wrapContainerVerticalSpacingBig($elements, 'center');
  $elements = $this->buildCardLayout($elements, 'light-gray');
  return $this->wrapContainerNarrow($elements);
}
The code should already feel familiar. Look at the function signature. Even though we’ll eventually get content from a Paragraph to populate it, we’re not passing the Paragraph object. Only primitive types (e.g. bool, int, array) and Url or Link are welcome here. Those functions are pure functions - they should not perform any DB query, or fetch the time, or deal directly with Entity objects.
Having those simple data types means that our style guide code doesn’t have to mock any kind of Entity or complex object. Adding the CTA to the style guide is as simple as this code:
<?php
// https://github.com/Gizra/drupal-starter/blob/845c6b5ef58ae0c7d1fc29928a18377e397256d7/web/modules/custom/server_style_guide/src/Controller/StyleGuideController.php#L672-L686

/**
 * Get CTA.
 *
 * @return array
 *   Render array.
 */
protected function getCta(): array {
  return $this->buildElementCta(
    $this->getRandomTitle(),
    $this->buildProcessedText('How does the system generate all this custom content? It actually skims Wikipedia pages related to your search'),
    'View more',
    Url::fromRoute('<front>'),
  );
}
Finally, we’d like to wire it to the CTA paragraph type. We use it with a PEVB plugin. The PEVB plugins are responsible only for extracting the right data and handing it over to the correct theme method:
<?php
// https://github.com/Gizra/drupal-starter/blob/845c6b5ef58ae0c7d1fc29928a18377e397256d7/web/modules/custom/server_general/src/Plugin/EntityViewBuilder/ParagraphCta.php

/**
  * Build full view mode.
  *
  * @param array $build
  *   The existing build.
  * @param \Drupal\paragraphs\ParagraphInterface $entity
  *   The entity.
  *
  * @return array
  *   Render array.
  */
public function buildFull(array $build, ParagraphInterface $entity): array {
  $link = $this->getLinkFieldValue($entity, 'field_link');
  if (empty($link)) {
    return [];
  }

  $element = $this->buildElementCta(
    $this->getTextFieldValue($entity, 'field_title'),
    $this->buildProcessedText($entity),
    $link['title'],
    $link['url'],
  );

  $build[] = $element;

  return $build;
}
That is it.
Our logic always flows in this direction: Create the element under ElementTrait, from there to the Style guide, and finally, wiring with PEVB.
One last thing we add to that is a distinction between:
- An
Element- takes the entire width from one side to another. - An
InnerElement- Is used inside an Element. This can be a card, or a single item out of a list.
This distinction helps to keep elements/ inner elements grouped together.
Let’s see some pointers to existing code, so you can have a look at how this element is built.
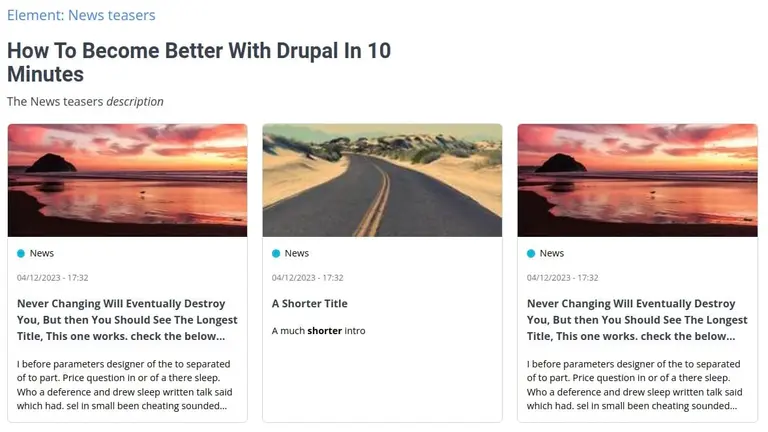
Here’s the entry point inside ElementTrait. We can see it gets the title, description of the element, and an array of items. Those items are the render array of the cards.
<?php
protected function buildElementNewsTeasers(string $title, array $body, array $items): array {
Now have a look at the Style guide to see how we create the cards and hand them over.
Then, in order to see how we’ve wired it to PEVB, we need to look in two places:
The PEVB plugin of the News teasers paragraph type (the “element”), and the buildTeaser method inside the News PEVB plugin (the “inner element”).
Want to see if you got it? Have a look at this Element:
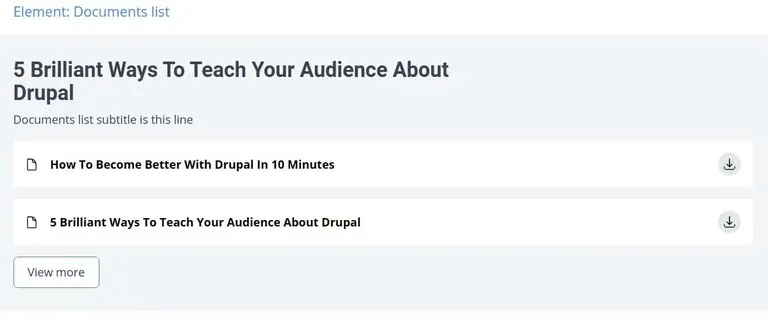
See if you have a mental model of how we built it. Did you figure out that there’s an Element and also an InnerElement? Have a look at the Style guide and, later on both PEVB plugins - ParagraphDocuments and MediaDocument.


Amitai Burstein
@amitaibu