Stress Testing - Go Ahead and Crash Your Site
Using some available tools for website stress testing, let's learn how to crash your site before your visitors do!
If you’d like to challenge your infrastructure provider, your development team, or you’re simply looking forward to optimizing the scalability of your web application, join us for a short adventure to stress test gizra.com.
At the beginning, we discuss some conceptual lessons learned, so you may jump to the explanation of the implementation directly .
Who?
Who should we trust to perform stress testing? An old player, like JMeter? Or newcomers like Gatling.io or Locust.io?
We ended up using Gatling.io for our latest stress testing issue. We discarded JMeter, as its UI was hard to understand and it has an XML-based, not human-friendly file format. There are subtle technical differences in the background related to the connection handling and the overall performance of the test execution; but in our scenario, we were far from the situation that the tool would limit our ability to get a realistic picture of the application’s behavior.
Locust.io, on the other hand, has an expressive language. We started to build tests with it, but when it came to resource processing, variable handling, plugins, it turned out that Gatling.io has a much broader ecosystem than Locust.io. When you have an actual problem to solve, you are more likely to find an example or a solution for Gatling.io. Needless to say, that could change easily in the future.
The icing on the cake is that Gatling.io provides a framework to write your tests in a functional language - something we all love!
What?
What is Stress Testing?
Stress testing is really not web development specific, you can stress test your CPU, your network and, of course, your website. There are various goals to stress testing:
- Determine the available capacity.
- Understand how the system degrades when it fails to perform perfectly.
- Know when the system becomes totally unavailable.
What Do You Want to Stress Test?
In case of stress testing a website, there is a decision on what precisely to test. For instance you could choose:
- the infrastructure where the given instance of the site is hosted.
- one of the present caching layers (CDN, Drupal page cache, etc.).
- for anonymous visitors or for logged in users.
- with or without executing the front-end code of the website.
You can mix your set of goals, but during the implementation, you need to pay attention to follow this decision. For instance, if you would like to exclude Varnish cache from the testing, but still, you want Drupal to use page cache, you’ll need to do some tricks, such as setting an invalid session cookie header that prevents Varnish from caching, however allows Drupal to use the page cache as usual.
When?
When is it the right time to execute the tests?
We could just say ‘always’, but the more nuanced answer depends on your application. If it’s mostly for anonymous users, stress-testing it in a production-like environment once, just near the launch seems to be adequate. For systems with lots of logged in users, where the performance can vary a lot from release to release, it would make sense to execute it before each major release.
Where?
So you’re at the beginning of your project and it’s critical to provide excellent performance and scalability, then you can integrate Gatling.io into Travis. When your site is bootstrapped, it’s perfectly possible to execute a stress test and define a threshold for the throughput and let Travis fail if the result does not exceed the defined value. Be prepared that this will slightly increase the instability of your Travis builds, as the available resources in the environment that Travis provides are not fully stable, and sometimes there will be sporadic failures. Despite that, it can be a very appealing option to ensure that the performance and the scalability does not degrade during sprints.
If you would like to perform a test in a production-like environment, Travis won’t tell you if your infrastructure or service provider lags behind its promise. A production-like environment has:
- the same amount of bandwidth as production.
- the same database as production (except with sanitization).
- the same level of hardware resources.
You can safely ignore that the live site has real users, but your other environment does not, as the stress test will ideally reach the limits of the stack regardless of existing human users.
Outside of Travis, you might be able to execute the tests from your local environment, but you can benefit a lot from a hosted service, like BlazeMeter (post a comment if you know a better alternative). Why not locally? The service can make sure and can monitor that your test execution is not limited by:
- the available bandwidth.
- the computing resources of the test-executing machine.
- the geographical distance to the target.
There are these and other factors that affects the realistic execution, and using a hosted service can help you to avoid these pitfalls.
Why?
As you’re reading this paragraph, likely you have your own answers. My short answer would be to be able to spot problems before they happen. Such “gotchas” that I’ve seen in the past:
- Under-performing hosting provider.
- Misconfigured Varnish.
- Non-functioning anonymous page cache.
- Non-scalable algorithm in custom/contributed code.
- Insufficient available bandwidth (compared to the static assets on the site and the expected traffic).
It’s actually an exciting problem-solving game to analyze the output and understand what kind of problems there are, if any.
How?
Now after reading my various thoughts on stress testing, let’s craft one test together against Gizra.com.
You may notice that we use Scala to write the tests. Don’t worry, with all the great tutorials and examples, no Scala knowledge is needed, a little experience with functional programming will certainly help. Let’s incrementally add new pieces to a small building block together until we have an executable test.
A Simple HTTP Request
To issue a single static HTTP request, it can be as simple as:
val scn = scenario("Gizra")
    .exec(http("request_0")
      .get("/blog/")
    )
Here, we issue a single HTTP request at the host, to retrieve the blog page. None of the images, CSS or JS files will be retrieved, just this single URL, nothing else. We will add the base URL handling at a later step.
Headers
Real browsers do send various headers alongside the request, we can make it more realistic this way:
val httpProtocol = http
  .acceptHeader("*/*")
  .acceptEncodingHeader("gzip, deflate")
  .acceptLanguageHeader("en-US,en;q=0.5")
  .doNotTrackHeader("1")
  .userAgentHeader("Mozilla/5.0 (X11; Linux x86_64; rv:58.0) Gecko/20100101 Firefox/58.0")

val headers_0 = Map(
  "Accept" -> "text/html,application/xhtml+xml,application/xml;q=0.9,image/webp,*/*;q=0.8",
  "Upgrade-Insecure-Requests" -> "1")

val scn = scenario("Gizra")
    .exec(http("request_0")
      .get("/blog/")
      .headers(headers_0)
    )
We have the ability to define global headers via the http protocol and also for each request. Right now we did not connect the httpProtocol with our scn scenario, as it will happen when we define our users.
Dynamic HTTP Request
Let’s say we’d like to simulate a user who arrives to the blog page and visits the first blog entry. Then what is the URL of that first item? It’s only possible to know from the response of the first query. Fortunately, Gatling gives us the ability to parse the result and use it in the next request this way:
  val scn = scenario("Gizra")
    .exec(http("request_0")
      .get("/blog/")
      .check(css("#blog-page .content:first-of-type a", "href").saveAs("blogentry"))
    )
    .exec(http("request_1")
      .get("${blogentry}")
    )
If you test a web service and you need to use jsonPath or xPath, that’s doable as well.
Visitors
Until now, what we have done behaves exactly like a browser-based automated test. In the end, we defined how and what should be downloaded via HTTP requests, indeed using a novel syntax. We have our httpProtocol and the scn scenario, we can now ask Gatling to create some users and gradually put more pressure on the site and the infrastructure:
  setUp(scn.inject(
    rampUsers(10) over(10 seconds),
  )).protocols(httpProtocol)
In this scenario, we ask Gatling - over the course of 10 seconds - to add 10 users. There are many strategies that Gatling can follow when injecting new sessions to the simulation.
A Simulation Class
Now it’s time to use a bit more from Scala, but actually it does not vary a lot from test to test, so our whole class looks like this:
import scala.concurrent.duration._

import io.gatling.core.Predef._
import io.gatling.http.Predef._
import io.gatling.jdbc.Predef._

class GizraCom extends Simulation {
  val testServerUrl = scala.util.Properties.envOrElse("GIZRA_COM_BASE_URL", "https://www.gizra.com")

  val httpProtocol = http
    .baseURL(testServerUrl)
    .acceptHeader("*/*")
    .acceptEncodingHeader("gzip, deflate")
    .acceptLanguageHeader("en-US,en;q=0.5")
    .doNotTrackHeader("1")
    .userAgentHeader("Mozilla/5.0 (X11; Linux x86_64; rv:58.0) Gecko/20100101 Firefox/58.0")

  val scn = scenario("Gizra")
    .exec(http("request_0")
      .get("/blog/")
      .check(css("#blog-page .content:first-of-type a", "href").saveAs("blogentry"))
    )
    .exec(http("request_1")
      .get("${blogentry}")
    )

  setUp(scn.inject(
    rampUsers(10) over(10 seconds),
  )).protocols(httpProtocol)

}
It is convenient for local execution that you can override the base URL via the GIZRA_COM_BASE_URL environment variable, so:
export GIZRA_COM_BASE_URL="http://gizra.local"
./run.sh
would test your local instance instead of the live site For this run.sh, continue reading.
Execute it on Local
During the implementation of your test, you surely want to execute it locally, a little script can be convenient, especially if you are not alone on your project:
#!/bin/bash

BASE_DIR="$( cd "$( dirname "${BASH_SOURCE[0]}" )" && pwd )"
if [ ! -d "$BASE_DIR"/gatling-charts-highcharts-bundle-2.3.0 ]; then
  cd "$BASE_DIR" || exit 1
  wget https://repo1.maven.org/maven2/io/gatling/highcharts/gatling-charts-highcharts-bundle/2.3.0/gatling-charts-highcharts-bundle-2.3.0-bundle.zip
  unzip gatling-charts-highcharts-bundle-2.3.0-bundle.zip
  rm gatling-charts-highcharts-bundle-2.3.0-bundle.zip
  cd gatling-charts-highcharts-bundle-2.3.0 || exit 1
  ln -s "$BASE_DIR"/GizraCom.scala user-files/simulations/
fi
cd "$BASE_DIR"/gatling-charts-highcharts-bundle-2.3.0 || exit 1
./bin/gatling.sh -s GizraCom
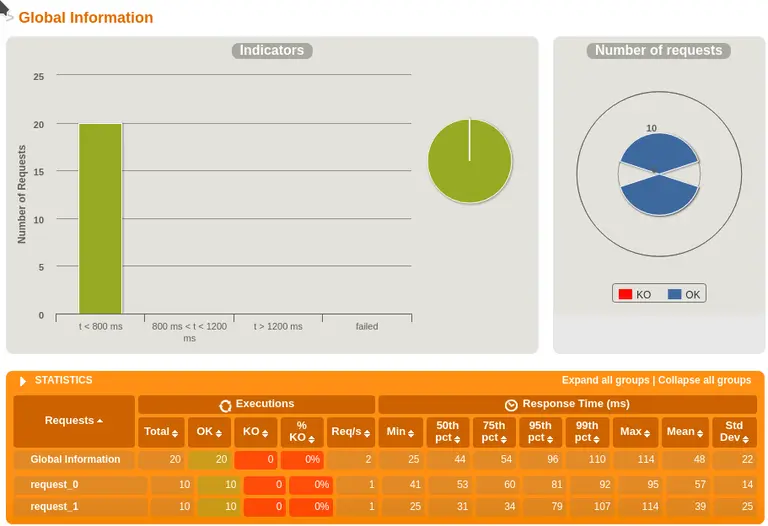
The HTML report is detailed and ready to show even for business stakeholders, along with your expert insights:
Execute It on BlazeMeter
Optionally, if you aim for realistic, large-scale executions of this test, we can put it in the cloud. The ingredients here are:
- a (free) BlazeMeter account
- a Taurus configfile,
test.yml:
execution:
- executor: gatling
  scenario: sample

scenarios:
  sample:
    script: GizraCom.scala
    simulation: GizraCom
    keepalive: true
This is needed for BlazeMeter to be able to recognize the Gatling test, it’s fully specific to this service. If you plan to execute it only locally, you don’t need it.
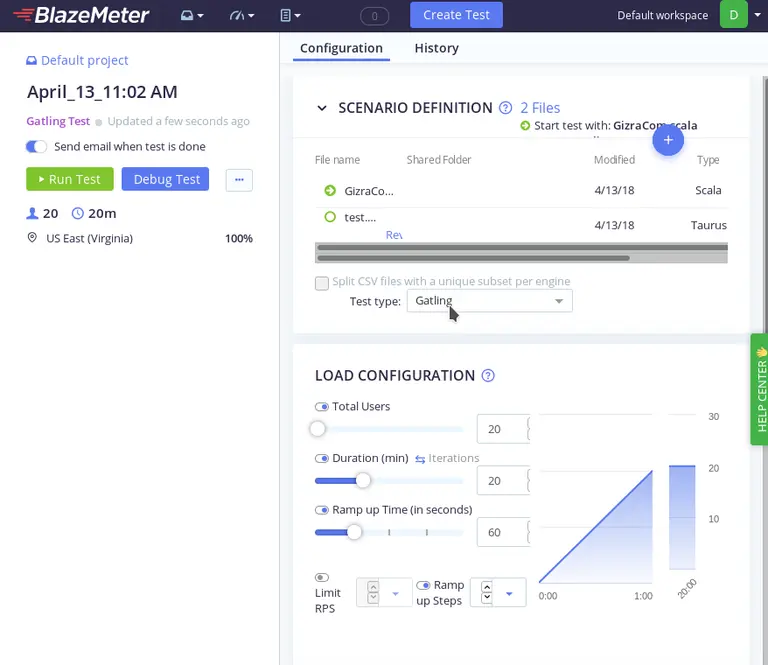
After this, you can upload the simulation files (as Taurus tests), and do a little configuration:
And you have even fancier reports than last time - enjoy!

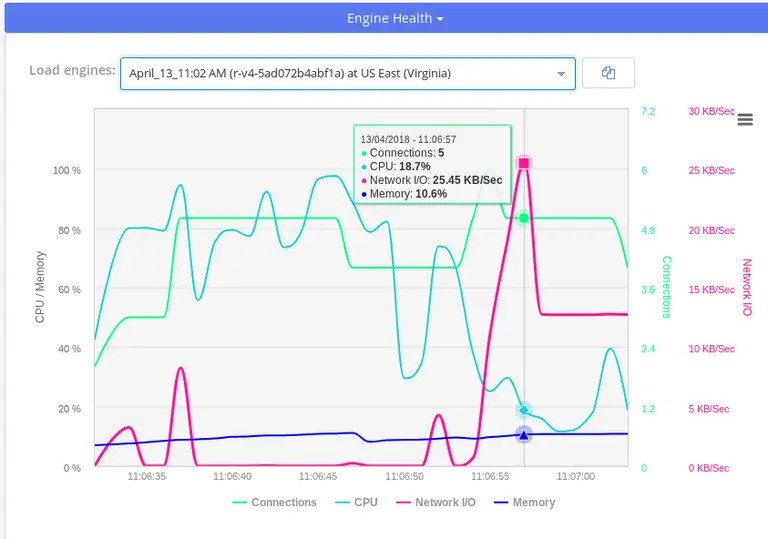
Moreover without extra effort, you can trivially make sure that the test is not bound by the infrastructure:
Simulation Recorder
There is a lazy way to be able to record simulation using a GUI, if you just start to experiment with Gatling. Try it out, but for any non-trivial tests, you need to touch the Scala code. For such tests, where you’re interested in downloading lots of static resources and it would be quite boring to code it manually, give it a shot.

Icing on the Cake - Integration Tests on Travis
So you just developed a neat, complex stress test suite for your intranet and you have a plan to maintain it alongside your core project. That’s great! Create a tiny Travis integration for the stress test repository, then you can relax: if Travis remains green, the Scala code compiles and the stress test can be executed. If you do it with minimal amount of users, it’s likely acceptable to do it on the production site, so your stress testing repository can have the usual Travis status image as your other repositories.
Takeaway
You can access this tiny showcase on GitHub. Fork it, make it a fully-featured boilerplate, make a PR, all are highly appreciated!
Stress testing has a friendly learning curve if you already have the mindset for browser-based testing. Start today, and you can make commitments to your clients that your site will scale.


Áron Novák
